Transferring a website isn’t something that you should take on yourself unless you absolutely know what you’re doing. If you don’t and you attempt to do it yourself, you will break the site and you could lose some emails.
Before we begin, we need to write down a couple of things to safely transfer website from one host to another and go over some basic questions before we start transferring your site.
Table of Contents
Domain
Is your website keeping the domain or moving to a new domain? This complicates things but it’s not difficult to change.
How is your email situation being handled? Are emails being handled by your hosting company (all emails are stored locally with the host) or are your emails hosted by a third party such as Google Apps or Office 365.
If you’re not using WordPress, then this process is relatively simple. Simply login to your FTP account and download everything in the public_html folder. Upload everything you’ve just downloaded into your new hosting account, under the public_html folder. That takes care of the website but we still have the emails which we’ll cover in a minute.
Backing Up
If you have WordPress, then you’ll need to backup two things: Your site and your emails (provided that your emails are being handled via your hosting company).
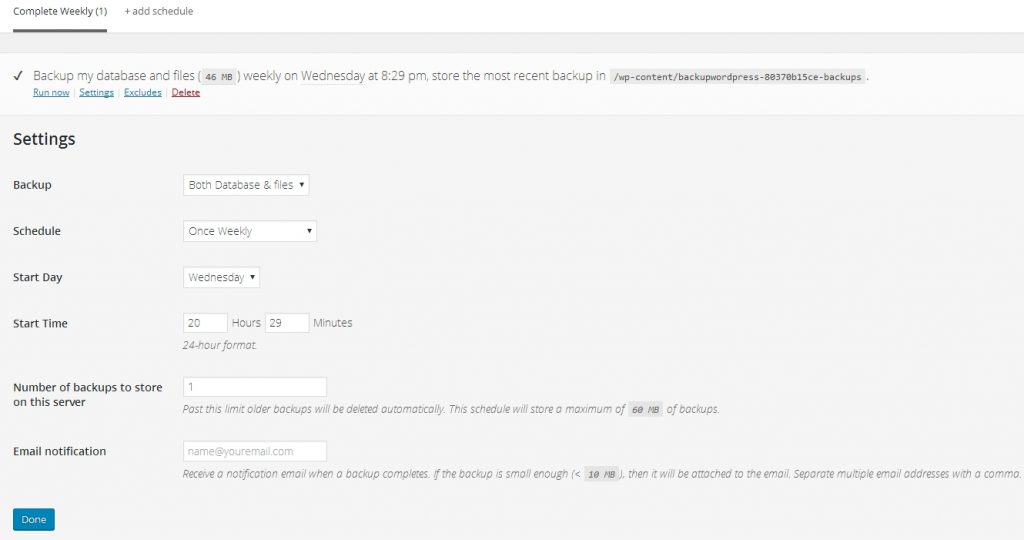
Login to WordPress and install a plugin called BackUpWordPress. Once it’s installed, go to Tools>Backups and click on settings. You need to make sure that both database and files are selected. Run and download the backup.
Next is the emails. Skip this step if you don’t care about your current emails, don’t need them or they’re not with your hosting provider.
Transferring Emails
The easiest way to do this is with Microsoft Outlook. Every host will be different so you’ll need to find out the proper server settings for your server and for the new host before we begin.
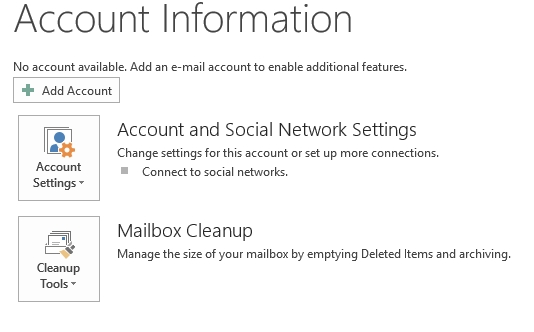
Open up Outlook and click on File. From there, we need to create a new account.
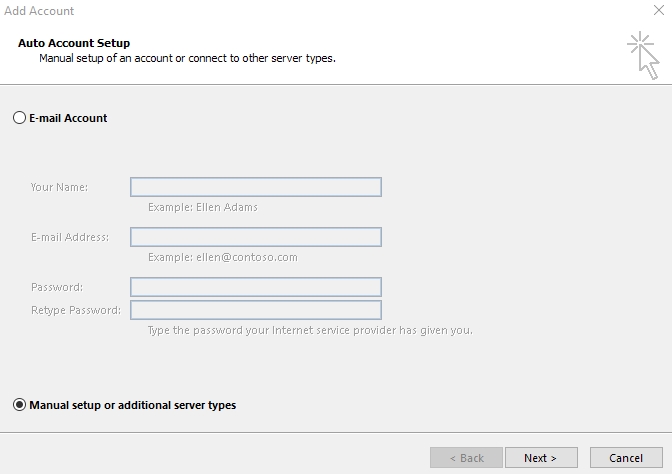
Next, make sure that you have manual selected before clicking on next.
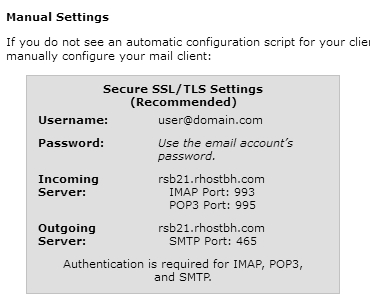
Before we proceed, we need to write down some information from both hosting companies. Access your current host’s cPanel and click on ‘Email Accounts’. Click on ‘More’ on the right hand side to get a drop down of more options and then select ‘Configure Email Client’. These are the settings you’ll need to connect. They’re different from host to host. Also, make sure you’re using the IMAP port. If you’ve setup a POP3 account then downloading emails isn’t necessary.
Once you’ve successfully setup an account, it will now sync all of the email from the server. Once it’s done syncing all emails, you need to export a .PST file. Go to File>Open & Export and it will guide you through the options to export a PST file. Make sure it’s somewhere you’ll remember.
Next, we’re going to change our account settings in Outlook to connect to the new server. Go to File > Account Settings > Account Settings and from there, you can edit the current server settings to your new server. Once you’re connected, go back to Open & Export and open that PST file you saved. That’s all of your emails and they’ll begin syncing to your new server via IMAP.
You have to do this for every single email account you have if you want to transfer emails.
Site Transfer
Connect via FTP to your new hosting provider through FileZilla (or the program of your choice).
Upload all of the site files you downloaded previously to your new hosting public_html folder.
Once that process is done, open up your new cPanel (http://yourdomain.com:2082).
Go to the Databases section and click on Databases. Create a new database and write down the database name, database user and database password.
Add the user you just created to the database you just created and give them full access.
SKIP THIS STEP IF YOU’RE NOT SWITCHING DOMAINS: Next, you need to edit the database you saved off of the old site. Open the database up with a text editing program like WordPad or any database editing software of your choice. From there, use the Find & Replace function to find yourdomain.com and replace ALL with yournewdomain.com. Once that’s done, save it somewhere you’ll remember and go back to your cPanel.
Access PhpMyAdmin and login with the credentials you created. Import the database you just saved or didn’t save if you didn’t have to edit the database.
If you don’t do the step above and you switch domains, nothing on your site will work, images will be missing, etc.
Open up wp-config.php again and input the new database user, database name and password settings.
If everything was configured correctly, your site should now be up on the new host but there’s just one problem. You’re missing records if you didn’t do a registrar transfer of your domain. That means your hosting is with another host but your domain registrar is still with the old host. This part is relatively easy to fix.
Simply login to the cPanel of your old host and update your nameservers (NS) to the new host. You may have to contact your hosting providers to find out where the input to do this is as it differs from host to host and to find out the values you need to implement. After that’s done, you’re now moved!


